A pilot is not expected to have extensive knowledge of all traffic patterns from all airports. But if the pilot is familiar with the basic rectangular design, it is easy to make departures and approaches from most airports. Just as roads are essential for operating cars, airports are essential for operating aircraft.
Initially, Traffic Pattern was made so that planes could fly in and out of the airport along a fixed route and a five-sided flight section.
The main purpose of the five-sided flight is to allow the pilots who need to do take-off and landing exercises. It’s easy to have the same trajectory and position to increase safety.
The five-sided flight has five stages: Upwind/ Crosswind/ Downwind/ Base,/ Final.
Because it is a quadrilateral that turns left after taking off from the airport, it is also known as the “Left pattern/standard pattern.”
First step: Upwind
During this take-off process, the aircraft will undergo procedures such as take-off, climb, and retracting the landing gear to keep the runway extension centerline flying forward.
Second step: Crosswind
It is part of the rectangular pattern that is horizontally perpendicular to the extended centerline of the takeoff runway. Then makes a 90-degree turn to the left (or right) to enter the Crosswind phase. The aircraft will continue to climb, usually turning into the Downwind phase when it reaches an angle of about 45 degrees to the end of the runway.
Third step: Downwind
At this point, the aircraft will continue to climb to reach the Take-off and Landing Route Altitude. The small plane will do the procedure at 1000 feet, 1000 AAL (Above Airport Level). The large passenger aircraft is 1500 feet. It will maintain the set throttle and altitude if you want to enter the Downwind phase at a 45–degree angle after confirming the landing runway and the information about the aircraft. The third side is usually about 0,5 -1 NM from the runway. In this way, you can get close to the runway. It is more comfortable, and even if the engine encounters problems, you can safely glide and land on the runway.
Fourth step: The base turn
The pilot will enter the landing stage when it comes back. The small aircraft usually start to turn into the base when it shows an angle of about 45 degrees with the runway head. The large passenger aircraft must rely on the timer to calculate and turn until it is perpendicular to the runway.
Final step: Final leg
Wait for the extension of the runway centerline to approach. It is about 1.5 to 2 NM away from the airport and starts to make the final turn. After aligning to the centerline of the runway, lower the appearance and landing gear. To perform the final inspection before landing, maintain the correct deceleration, descent rate, approach, landing, brake, and taxi out of the runway to complete the final process.

When flying in a traffic pattern, all pilots must comply with the following procedures, according to the legislation:
✓ When you enter with the aircraft in the airport traffic area, adjust and verify radio frequencies.
✓ Don’t forget to declare your position ten nautical miles out and watch for other inbound traffic.
✓ Be sure you report when entering downwind, turning base downwind, and turn to final. This is a good practice in non-towered traffic.
✓ Try to descend to traffic pattern altitude before entering the pattern.
✓ Be focus to keep a constant visual lookout for other aircraft.
✓ Set and monitor the proper CTAF frequency.
✓ Be aware that other aircraft may be in the pattern without radios.
✓ Use exterior lights.
Visual approaches must be discontinued if visual reference is lost!
The traffic pattern is the same for all aircraft, but we need to consider different weights, speeds, distances, NM, wake turbulence, weather, terrain, wind.
A visual approach can be done near an airport if ATC gives permission and the weather is good.
Aircraft executing a visual approach shall intercept descent path at not lower than 1000 feet QFE. If flying visual straight in final from an instrument approach, RVR must be no less than 800 m.
As a rule, the minima for a visual circuit are visibility of 1500 m and ceiling of 2000 ft. Visual approaches must be discontinued if visual reference is lost. We enter every time in the third leg, downwind with flaps 5. Timing from abeam landing threshold to base turn: 3 seconds/100 feet AAL. (for example, 1500/100 =15 x3 =45 sec. Correct this timing for wind: + HW/- TW wind component divided by two. When the time is over, gear down flaps 15 (landing flaps for one engine). ARM speed brake, set Missed Approach on the MCP. On the base leg landing flaps, start descent when you see the RWY, and check with the PAPI. Initially, you can descend at 500 feet per min’.
Need to know tips and tricks!
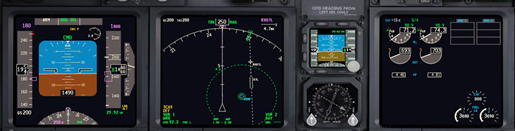
Briefly and very useful in the simulator, and real-life; Set in the FMC, RWY for example 07 L, RWY extension 2NM, and you will see on the ND – RX RWY 07 L, (Check FIG 2). This can help you to make a better calculation in rapport with the runway when you start the base turn and final. In the simulator for exercises, you can set also in the FIX page for example RW 07 L, or EDDF RADIAL/ AND DISTANCE/ and you can use the execution NM from Circling Approach 4.2 NM (CAT C), 5.28 (CAT D), which will display a fully accurate depiction of the PANS-OPS protected area for the circle to land approaches.
Young cadets from aviation school will better understand each procedure after they practice many times. They should read very carefully each procedure, and they need to take into consideration strong wind, visibility, and other factors. Have good and safe landings!